不要忘了添加带有路由标记的路由
故障转移介绍
在这篇文章中研究另一种使用递归路由和路由部分的作用域进行故障转移的高级方法。当一条路由(无论是静态还是动态学习的)的下一跳没有直接连接到本地路由器时,就会出现递归路由。有必要限制一组可用于查找直接下一跳的路由。例如,RIP或OSPF路由的Nexthop值应该是可以直接到达的,应该只使用连接的路由来查询。这是用范围和目标范围属性实现的。
配置概述
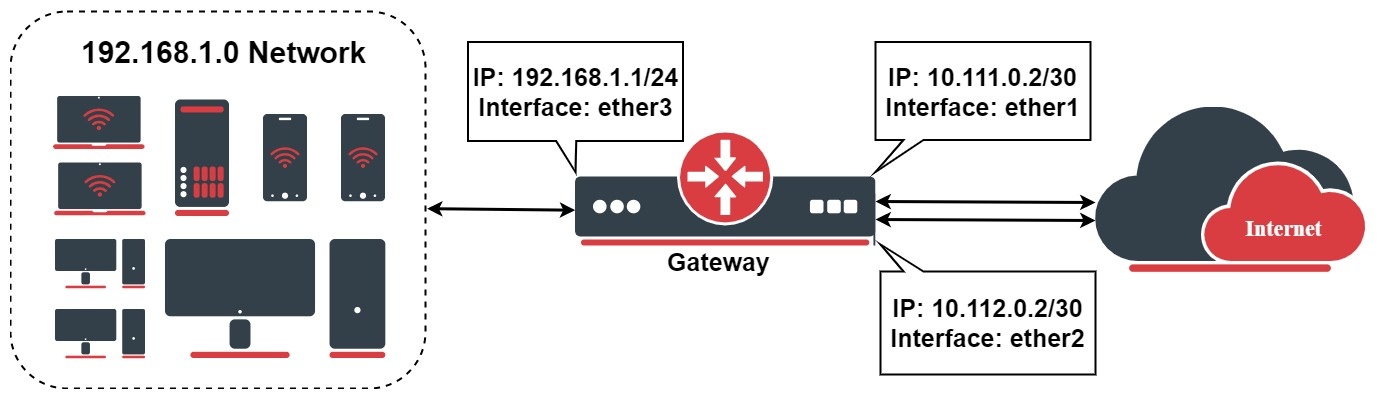
假设有以下设置:网关设备有两个公共网络上行链路。然后将流量分为两部分,一部分名称为 "ISP1",另一部分为 "ISP2",相应地通过ether1和ether2。在这个设置中,要监控两台主机。主机1和主机2。使用IP为8.8.8.8(Host1)和8.8.4.4(Host2)的谷歌DNS服务器,不一定专门使用这些地址。
在详细的例子说明之前,在一个设置中,在公共IP后面有私有IP地址,要配置源NAT:
/ip/firewall/nat
add chain =srcnat action =masquerade out-interface =ether1
add chain =srcnat action =masquerade out-interface =ether2
从配置路由表和防火墙混合规则开始标记流量,当进入路由部分时,将预先配置好一切。
/routing/table
add fib name =to_ISP1
add fib name =to_ISP2
/ip/firewall/mangle
add chain =output connection-state =new connection-mark =no-mark action =mark-connection new-connection-mark =ISP1_conn out-interface =ether1
add chain =output connection-mark =ISP1_conn action =mark-routing new-routing-mark =to_ISP1 out-interface =ether1
add chain =output connection-state =new connection-mark =no-mark action =mark-connection new-connection-mark =ISP2_conn out-interface =ether2
add chain =output connection-mark =ISP2_conn action =mark-routing new-routing-mark =to_ISP2 out-interface =ether2
把路由配置分成三部分。首先在路由部分将Host1和Host2配置为目标地址。
/ip/route/
add dst-address =8.8.8.8 scope =10 gateway =10.111.0.1
add dst-address =8.8.4.4 scope =10 gateway =10.112.0.1
现在配置将递归解析路由,只有在用ping可以到达时才会被激活。
/ip/route/
add distance =1 gateway =8.8.8.8 routing-table =to_ISP1 target-scope =11 check-gateway =ping
add distance =2 gateway =8.8.4.4 routing-table =to_ISP1 target-scope =11 check-gateway =ping
为第二个网关配置类似的递归路由:
/ip/route/
add distance =1 gateway =8.8.4.4 routing-table =to_ISP2 target-scope =11 check-gateway =ping
add distance =2 gateway =8.8.8.8 routing-table =to_ISP2 target-scope =11 check-gateway =ping
添加多个主机
在主机1和主机2失效时,相应的链接被认为是失效的。在本节中,使用两个额外的主机作为冗余。在这个例子中使用OpenDNS服务器Host1B(208.67.222.222)和Host2B(208.67.220.220):
/ip/route
add dst-address =8.8.8.8 gateway =10.111.0.1 scope =10
add dst-address =208.67.222.222 gateway =10.111.0.1 scope =10
add dst-address =8.8.4.4 gateway =10.112.0.1 scope =10
add dst-address =208.67.220.220 gateway =10.112.0.1 scope =10
然后为 "虚拟 "跳数创建目的地,以便在进一步的路由中使用。用10.10.10.1和10.20.20.2作为例子,可以用不同的地址,但要确保它们不会覆盖设置中其他配置的IP地址。
/ip/route
add dst-address =10.10.10.1 gateway =8.8.8.8 scope =10 target-scope =11 check-gateway =ping
add dst-address =10.10.10.1 gateway =208.67.222.222 scope =10 target-scope =11 check-gateway =ping
add dst-address =10.20.20.2 gateway =8.8.4.4 scope =10 target-scope =11 check-gateway =ping
add dst-address =10.20.20.2 gateway =208.67.220.220 scope =10 target-scope =11 check-gateway =ping
不要忘记添加带有路由标记的路由:
/ip/route
add distance =1 gateway =10.10.10.1 routing-table =to_ISP1 target-scope =12
add distance =2 gateway =10.20.20.2 routing-table =to_ISP1 target-scope =12
add distance =1 gateway =10.20.20.2 routing-table =to_ISP2 target-scope =12
add distance =2 gateway =10.10.10.1 routing-table =to_ISP2 target-scope =12